Deployment
Deploy your agents to Connic cloud using Git-based automatic deployments or CLI deployments.
Overview
Two ways to deploy your agents
Connic supports two deployment methods depending on your workflow:
Connect a Git repository to your project. Pushing to configured branches triggers deployments.
- • Automatic on push
- • Branch-to-environment mapping
- • Supports GitHub, GitLab, and Bitbucket
Deploy using the CLI, locally or in CI/CD pipelines. Useful for unsupported Git providers or custom workflows.
- • Works with any Git provider
- • Use in CI/CD pipelines
- • Manual control
Git Integration
Connect your Git repository for automatic deployments on push. Connic supports GitHub, GitLab, and Bitbucket.
Connect Your Repository
- Go to Project Settings → Git & Environments
- Click Connect and select your provider (GitHub, GitLab, or Bitbucket)
- Authorize Connic via OAuth to access your repositories
- Select the repository containing your
agents/,tools/, andmiddleware/directories - If your repo is a monorepo, set the Repository root directory to the path where your Connic SDK project lives (e.g.
services/agents). Leave empty when the SDK files are at the repo root. - Connic installs a webhook on the repository to detect pushes
Configure Environment Branches
- Open Project Settings → Git & Environments
- For each environment, set the Git Branch that triggers deployments
- Pushes to branches that are not mapped to any environment are ignored
For example:
- • Production →
main - • Staging →
develop - • Development →
feature/*(optional)
Push to Deploy
Push changes to your configured branch. Connic detects the push via webhooks and creates a new deployment.
# Push to trigger deployment
git add .
git commit -m "Update agents"
git push origin main
PR Testing
Run your test suite against pull-request code before it merges. When a PR opens or its head updates, Connic checks out the head commit, runs the same test pipeline as connic test against the env whose branch matches the PR's base, and reports the result back as a commit status on the PR.
Toggle It Per Environment
PR Testing is a per-environment toggle. By default it's on for every env that has a git branch set, so PRs into main run tests in your Production env, PRs into develop run in Staging, and so on.
- Open Project Settings → Git & Environments.
- Edit the env you want to change. The PR Testing toggle sits next to the deploy branch.
- If you set a Test environment on the env, PR tests run against that env instead of the env itself — useful for keeping PR traffic out of production.
Open a PR
Connic detects the PR via webhooks, runs your tests against the matching env, and posts a commit status back to the PR.
Require It as a Merge Check (optional)
The status posted on each PR uses the context connic/pr-tests. To block merges until it passes, configure branch protection on the repo:
- On GitHub, go to the repo's Settings → Branches and add or edit a branch protection rule (e.g. for
main). - Enable Require status checks to pass before merging and add
connic/pr-teststo the required list.
Currently supported on GitHub. Requires a tests/ directory in the repo with at least one YAML test file.
CLI Deployments
Use the CLI to deploy from your local machine or CI/CD pipeline. This is the recommended approach for:
- Git providers not yet integrated (GitLab, Bitbucket, self-hosted)
- CI/CD pipelines where you want full control
- Projects not using Git at all
Install the SDK
pip install connic-composer-sdkAuthenticate
Create an API key in Project Settings and authenticate:
connic loginThis creates a .connic file:
{
  "api_key": "cnc_xxxxxxxxxxxx",
  "project_id": "your-project-uuid"
}
For CI/CD, use environment variables instead: CONNIC_API_KEY and CONNIC_PROJECT_ID
Get Your Environment ID
Go to Project Settings → Git & Environments and copy the environment ID you want to deploy to.
Deploy
# Deploy to default environment
connic deploy

# Deploy to a specific environment
connic deploy --env <environment-id>
The CLI packages your agents/, tools/, middleware/, schemas/, and requirements.txt and uploads them. That includes nested files inside agents/ and tools/ when you choose to organize a larger project that way.
CI/CD Integration
Use the CLI in your CI/CD pipeline to deploy on push, even with Git providers that aren't directly integrated yet.
# Example: GitHub Actions (.github/workflows/deploy.yml)
name: Deploy to Connic
on:
  push:
    branches: [main]
jobs:
  deploy:
    runs-on: ubuntu-latest
    steps:
      - uses: actions/checkout@v4
      - run: pip install connic-composer-sdk
      - run: connic deploy --env $CONNIC_ENV_ID
        env:
          CONNIC_API_KEY: ${{ secrets.CONNIC_API_KEY }}
          CONNIC_PROJECT_ID: ${{ secrets.CONNIC_PROJECT_ID }}
CONNIC_ENV_ID: ${{ secrets.CONNIC_ENV_ID }}# Example: GitLab CI/CD (.gitlab-ci.yml)
deploy:
stage: deploy
script:
- pip install connic-composer-sdk
- connic deploy --env $CONNIC_ENV_ID
variables:
CONNIC_API_KEY: $CONNIC_API_KEY
CONNIC_PROJECT_ID: $CONNIC_PROJECT_IDSet CONNIC_API_KEY, CONNIC_PROJECT_ID, and CONNIC_ENV_ID as CI/CD secrets in your provider's settings.
What Happens During Deployment
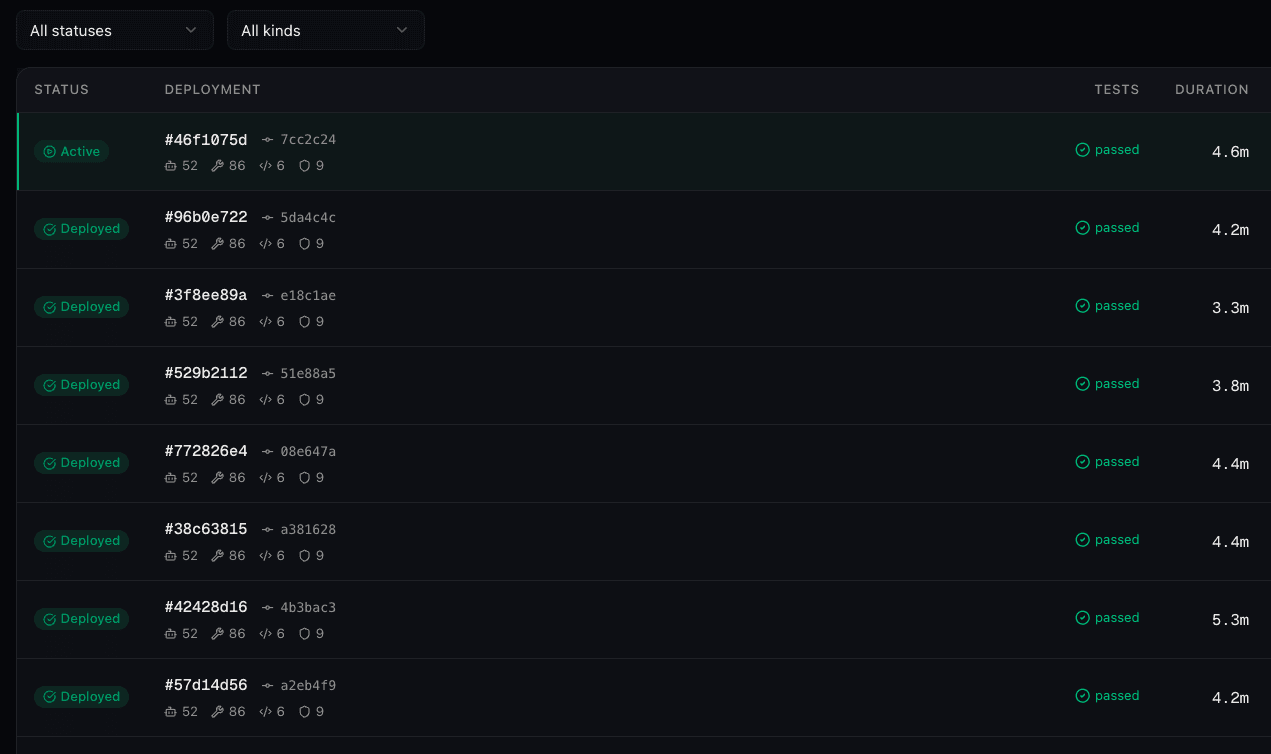
Monitoring Deployments
View deployment status, logs, and history in the Deployments tab:
- See all deployments with status and duration
- Click a deployment to view build logs
- The currently serving deployment is marked "Active"
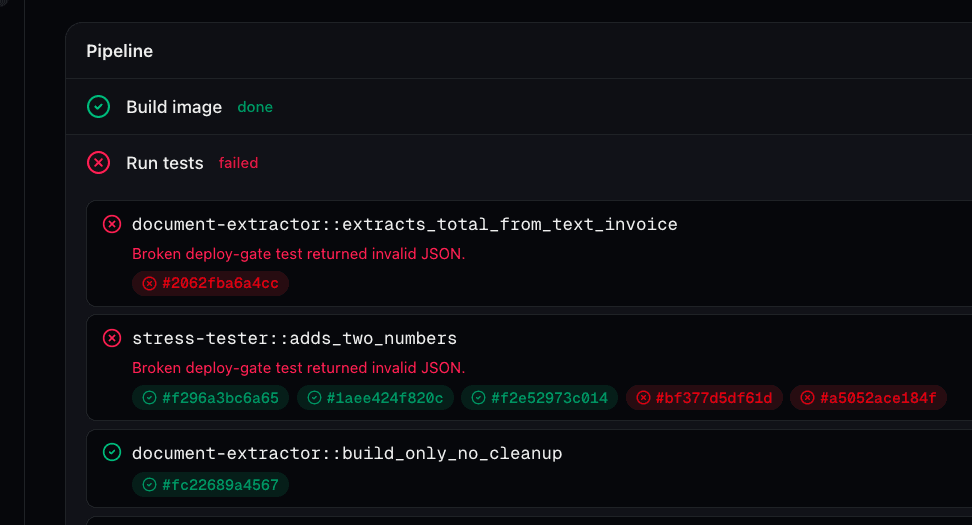
Test Phase (Deploy Gate)
If your project has a tests/ directory, every deploy (CLI or git) runs as a three-step pipeline:
- Build image: package the project into a runner image.
- Run tests: spin up a one-shot container from that image, execute every case, capture results.
- Deploy: only if all cases passed. Otherwise the deployment is marked Failed and nothing ships.
The deployment detail page shows the live pipeline with per-step and per-case status. You can also override which environment runs the tests via Settings → Git & Environments → Test environment, so the gate runs against stub credentials instead of production. Pass --skip-tests on connic deploy to bypass the gate as a hotfix escape hatch (git auto-deploys cannot skip).
See the Testing docs for the YAML format and assertion syntax.
Rollback a Deployment
If a deployment introduces an issue, you can roll back to a previous stable version:
- Open the Deployments tab and find a prior successful deployment
- Click the Activate button on that deployment
- Traffic is re-routed to the selected deployment immediately, without rebuilding
# Roll back by reverting a bad change
git revert <bad-commit-sha>
git push origin main
When a Deployment Fails
When a build fails, the deployment is marked Failed and the currently active deployment continues serving traffic unchanged. Your agents are never interrupted by a broken build.
Investigating a failure:
- Open the Deployments tab and click the failed deployment
- Review the build logs to identify the error
Common failure reasons:
- Missing dependencies in
requirements.txt - Invalid agent YAML syntax (malformed config, missing required fields)
- Python import errors in tools or middleware files