
Environments
Deployment environments map Git branches to isolated development, staging, and production workflows, with variables scoped to each environment.
On this page
Overview
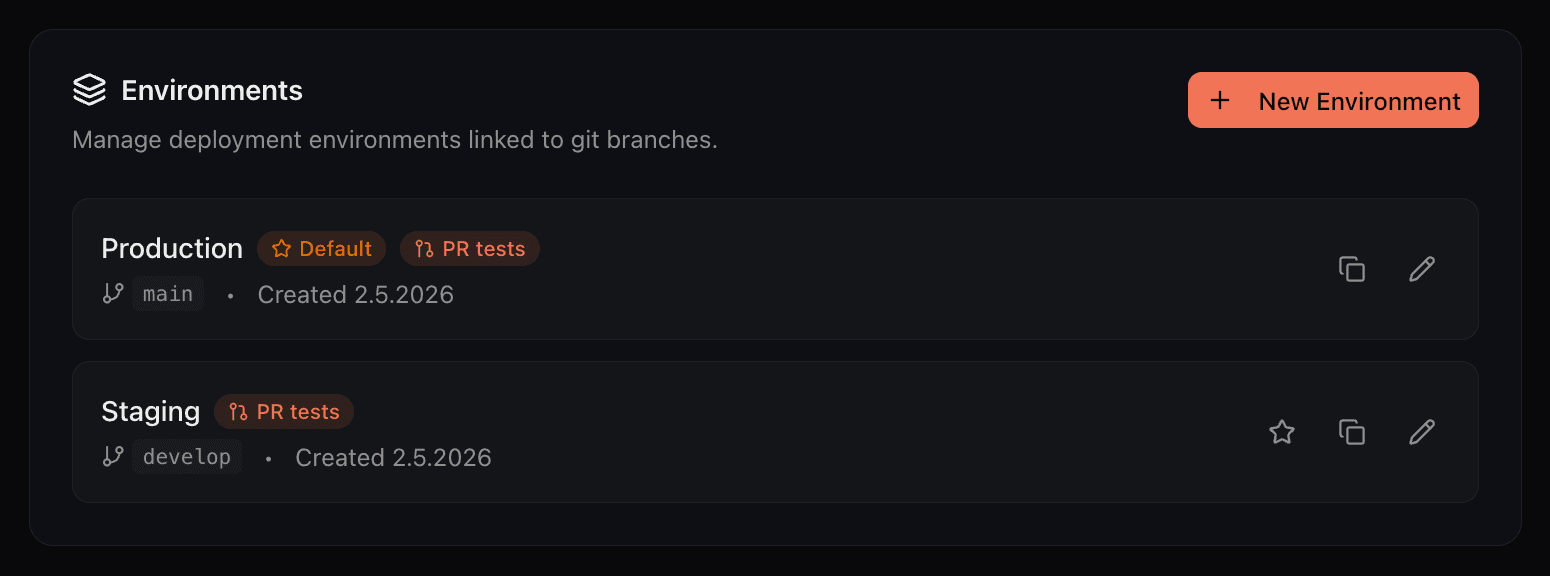
Environments run the same agent code with different configurations. A typical setup uses separate environments for production and staging, each with its own variables, deployment pipeline, and recorded runs. Every project starts with a default environment.
Manage environments in Project Settings → Git & Environments. The number of environments available depends on the subscription tier.
Creating an Environment
Click Create Environment and provide a name. If the project has a Git repository connected, link a Git branch to the environment. Otherwise, the environment will use CLI deployments.
| Field | Description |
|---|---|
| Name | A human-readable name for the environment (e.g. Production, Staging, QA) |
| Git Branch | The branch that triggers deployments to this environment. Only available when a Git provider is connected. Pushes to this branch deploy to this environment. |
Git Branch Mapping
When a Git repository is connected to a project, each environment can be linked to a specific branch. Pushing to that branch triggers a deployment to the corresponding environment. This enables workflows like:
mainMerging to main deploys to production
developPushing to develop deploys to staging for review
Refresh the available branch list from the project settings.
CLI Deployments
Projects without a connected Git repository use CLI deployments. Copy the target environment ID from the settings page and pass it to the deploy command:
connic deploy --env <environment-id>This approach also works for CI/CD pipelines that deploy to specific environments based on custom logic. See the Deployment docs for full CI/CD examples.
Default Environment
One environment is always marked as the default. The default environment is selected when the project dashboard opens and is the target for CLI deployments when no --env flag is specified. Change the default from the environment's menu.
Environment Variables
Variables are scoped per environment, supporting different API keys, database URLs, or feature flags for staging and production. Manage variables in Project Settings → Variables.
Adding Variables
Add variables one at a time through the form, or use the Raw Editor for bulk operations. Each variable can be added to several selected environments at once.
| Option | Description |
|---|---|
| Key | Variable name. Must start with a letter and contain only uppercase letters, numbers, and underscores (e.g. DATABASE_URL) |
| Value | The variable value. Can be shown or hidden during entry. |
| Sensitive | When enabled, the value is masked in the dashboard after creation. Use for API keys, passwords, and secrets. |
| Environments | Select one or more environments to create the variable in. |
Raw Editor
The raw editor accepts one KEY=VALUE pair per line. Prefix a key with ! to mark it sensitive; lines beginning with # are comments.
# Raw editor format (KEY=VALUE; prefix sensitive keys with !)
DATABASE_URL=postgresql://user:pass@host:5432/db
!OPENAI_API_KEY=sk-xxxxxxxxxxxx
LOG_LEVEL=info

# Lines starting with # are comments
Using Variables in Agents
Python tools and middleware read variables through os.environ. In MCP configuration, ${VAR_NAME} placeholders are supported in server URLs, headers, and bridge IDs.
In tools
import os
import httpx

async def call_external_api(query: str) -> dict:
    """Call an external API using environment-scoped credentials."""
    api_key = os.environ["EXTERNAL_API_KEY"]
    api_url = os.environ.get("EXTERNAL_API_URL", "https://api.example.com")

    async with httpx.AsyncClient() as client:
        response = await client.post(
            api_url,
            headers={"Authorization": f"Bearer {api_key}"},
            json={"query": query},
        )
        response.raise_for_status()
        return response.json()
In middleware
import os
from connic import StopProcessing

async def before(content: dict, context: dict) -> dict:
    """Validate requests using a private authentication service."""
    auth_url = os.environ.get("AUTH_SERVICE_URL")
    auth_secret = os.environ.get("AUTH_SERVICE_SECRET")

    if not auth_url or not auth_secret:
        raise StopProcessing("Auth service not configured")

    payload = context.get("payload", {})
    # ... validation logic using payload, auth_url, and auth_secret
return contentLog retention
Log retention controls how long an environment keeps runs before deleting them automatically. Open an environment's edit drawer in Settings → Git & Environments to set its retention period.
An empty field uses the retention included in the project's plan. Enter a shorter duration such as 1h, 24h, or 5d when an environment should retain that content for less time. The minimum is 1h, and the maximum is the retention offered by the current plan. Clear the field and save to return to the plan's default retention.
Sensitive data redaction
Sensitive data redaction replaces selected JSON field values with [REDACTED] in recorded inputs and outputs, including tool calls, as well as logs and traces. Use it to keep tokens, passwords, or customer details out of those records. Open Settings → Git & Environments, edit an environment, and find Sensitive data redaction.
Enter comma-separated JSON paths, for example user.token, *.password. Each path identifies a field by its name and location in the JSON. Matching is case-sensitive: token and Token are different fields. Leave the input empty to disable redaction for new data.
Redaction applies as new data is recorded; changing the setting does not rewrite existing history. Agents, tools, and callers continue to receive the original input and output values.
| Path | Matches |
|---|---|
token | The root field named token. Nested fields with that name stay unchanged. |
some.whatever.token | The field at exactly this nested path. |
*.token | Fields named token at any depth, including the root and inside arrays. |
items.*.token | The token field of each item in items. |
items.0.token | The token field of the first array item. Array indexes start at zero. |
A leading *. matches any number of parent levels. Elsewhere, * matches one object key or array index. Array traversal must be explicit: items.token does not match items[0].token. If a matched field contains an object or array, its entire value is replaced with [REDACTED].
Example
With user.token, items.*.token configured, this input produces the following recorded data:
{
  "token": "root-token",
  "user": {"token": "user-token", "name": "Ada"},
  "items": [{"token": "item-token", "id": 1}],
  "message": "token=user-token"
}{
"token": "root-token",
"user": {"token": "[REDACTED]", "name": "Ada"},
"items": [{"token": "[REDACTED]", "id": 1}],
"message": "token=user-token"
}The root token remains visible because neither path selects it. The message string also remains unchanged, even though it contains the same value as user.token.
JSON and plain text
Redaction works on JSON objects, arrays, and strings containing valid JSON. A JSON string inside a field keeps that field's path: for {"body":"{\"token\":\"secret\"}"}, use body.token or *.token.
Plain text, invalid JSON, and JSON embedded in a longer text message are left unchanged. For example, token=secret is not redacted by token. For structured Python logs, serialize the object with json.dumps(...) and log that JSON string without a text prefix. See Logs & debugging for logging examples.
Dev Environments
Dev environments back the connic dev hot-reload loop. They can be ephemeral (auto-deleted when the session ends) or named (persistent across sessions). They appear separately from standard environments in the environment selector.
- Grouped in a separate section of the environment selector
- Code is synced live from the local machine; the deployments page shows the running session with a Dev session badge
- Their own set of environment variables and connectors
See the Dev Server docs for the full workflow.
Test Environment Override
Each standard environment has an optional Test environment dropdown in Settings → Git & Environments. The deploy gate runs the test suite in this environment's context, using its variables, connectors, and credentials, before activating the deployment.
A prod-test environment with stub API keys and without production connectors keeps those integrations separate from the test suite for prod.
When the dropdown is empty, tests run in the deploy environment itself.
Switching Environments
The environment selector in the project header switches between environments. The selected environment controls the data shown across the dashboard: agents, runs, connectors, and variables are all scoped to the active environment.