Your Kafka cluster sits in a private VPC. Your Postgres database is locked behind a corporate firewall. Your internal APIs are only reachable via private DNS. None of these services are accessible from the public internet, and for good reason.
Now you want AI agents to react to events in these systems: process Kafka messages, listen for database changes, call internal services. How do you bridge a cloud-hosted agent platform and infrastructure that was designed to be unreachable?
The Problem With Traditional Approaches
Teams typically reach for one of a few options when connecting cloud services to private infrastructure. Each has real downsides:
What you actually need: a way for cloud agents to reach your private services without making those services reachable from the internet. That's what Connic Bridge does.
Bring the Kafka cluster, Postgres database, internal API, or MCP server your agent needs. Sales can show how Bridge routes access outbound-only with allowed hosts, approvals, and traces.
Discuss Bridge accessHow Connic Bridge Works
The Connic Bridge is a lightweight agent that runs inside your private network. It makes a single outbound WebSocket connection to the Connic relay, and that's it. No inbound ports, no VPN, no public exposure.
When a Connic connector needs to reach a service in your network, the relay forwards the request through the established tunnel to the bridge. The bridge then opens a local TCP connection to the target service on your behalf.
Setup in Three Steps
Getting Bridge running takes about five minutes. No networking to configure, no certificates to manage, no firewall rules to change.
Step 1: Generate a Bridge Token
Navigate to Project Settings > Bridge in the Connic dashboard and click Set Up Bridge. Copy the token that appears. It starts with cbr_ and is only shown once.
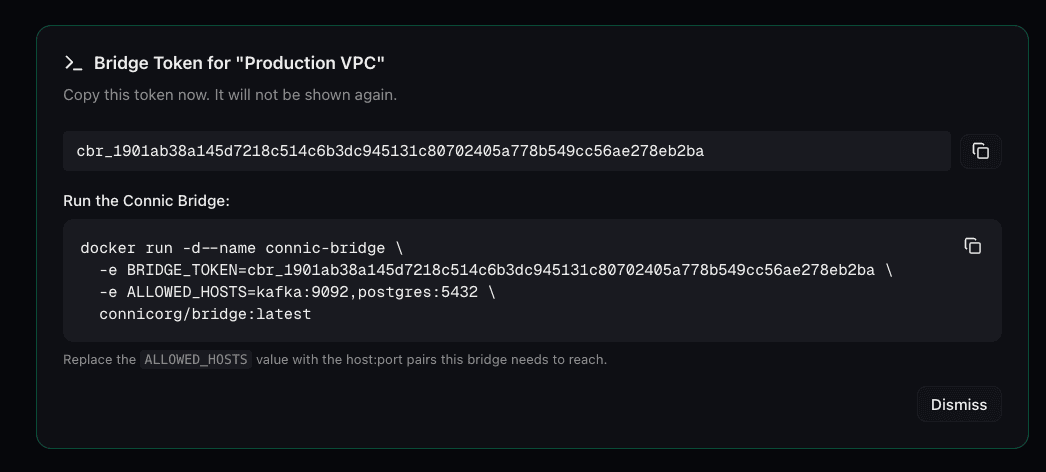
Step 2: Deploy the Bridge Agent
Run the bridge inside your private network. It needs outbound internet access (to connect to the relay) and local network access (to reach your services).
$ docker run -d --name connic-bridge \
  -e BRIDGE_TOKEN=cbr_your_token_here \
  -e ALLOWED_HOSTS=kafka:9092,postgres:5432 \
  connicorg/bridge:latest
The ALLOWED_HOSTS variable is a comma-separated list of host:port pairs the bridge is allowed to connect to. Any request targeting a host outside this list is rejected, which gives you explicit control over what your bridge can reach.
Prefer Docker Compose? That works too:
services:
  connic-bridge:
    image: connicorg/bridge:latest
    restart: always
    environment:
      BRIDGE_TOKEN: cbr_your_token_here
      ALLOWED_HOSTS: kafka:9092,postgres:5432,my-db:5432
Step 3: Enable Bridge on Your Connectors
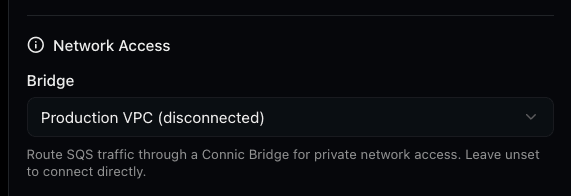
When creating or editing a connector, open the Network Access section and choose your bridge from the Bridge dropdown. Connic then routes that connector's traffic through the bridge tunnel instead of connecting directly. New to the connector layer? Read what pre-built connectors handle for you before adding Bridge.
Bridge access is supported on:
Security by Design
The bridge was designed with a zero-trust mindset. Every layer limits what's possible:
Real-World Use Cases
A few patterns we see teams building with Bridge:
Bridge vs. Alternatives
| Connic Bridge | VPN / Peering | IP Allowlist | |
|---|---|---|---|
| Setup time | 5 minutes | Hours to days | Minutes (fragile) |
| Inbound ports required | None | Multiple | Per service |
| Blast radius | Explicit host:port list | Entire VPC / subnet | Per IP range |
| Firewall changes | None | Yes | Yes |
| Ongoing maintenance | Near zero | High | Moderate (IP churn) |
Monitoring Your Bridge
Once deployed, you can check bridge status at any time in Project Settings > Bridge. The dashboard shows whether the bridge is connected and when it last connected, with controls to regenerate or revoke the token.
BRIDGE_TOKEN environment variable in your bridge deployment. The old token is revoked immediately.Getting Started
If your infrastructure is private, Bridge is the simplest way to connect it to your AI agents:
- 1.Open your project in the Connic dashboard and go to Settings > Bridge
- 2.Generate a token and deploy the bridge container in your network
- 3.Enable Connect via Bridge on any connector that targets a private service
- 4.Your agents can now consume events from and deliver results to private infrastructure
For the full configuration reference and troubleshooting guide, check the Bridge documentation. If you're new to Connic, start with the quickstart guide to deploy your first agent, then come back here to connect it to your private infrastructure.